How to back up your WordPress Site
Have you ever lost your WordPress site? Have you’ve been hacked and do you need to restore a clean version of your site? Perhaps your website just broke after installing a plugin, theme, or add-on. Maybe your hosting providers' servers crashed, or you simply forgot to renew your hosting plan, and they’ve deleted your site. Having a site back up should be one of the main priorities when you set up a site, if your site goes down, so can your business creditability.
Whilst most host providers offer “back up” services, most only create backups of your database, which means if the files are lost, or corrupted, you can say goodbye to your site. To prevent loss of business as well as pulling out your own hair, and put in place a backup strategy for your business, trust me it's going to help you in the long run.
In the following article, you’ll learn how to back up your WordPress site, we’ll cover doing a backup manually, and also some useful plugins that will help you do it all in one! If you’ve got a backup of your site created, restoring a previous version of your site going to be easy!
Just note that on shared hosting plans, doing a full backup of your site daily may slow down your site as it takes up considerable server resources, so only consider doing it once a month. You can back up your database daily or weekly if required as it's only a small file. With the plugin solutions below, most will give you these options.
Manual Back-Up
Manually backing up your site is going to be a more tedious process, and restoring it will take more time than the options below. It's still very useful to know, and if you’ve got some technical knowledge then it's going to be a breeze. For those of you who aren’t technical, you may want to skip ahead to the plugin options in the next section.
Your WordPress directory contains various sub-folders, wp-content, wp-includes, your config files, themes, and plugins required by your site. WP-content contains all themes, plugins, cache, and image uploads, you don’t want to lose this data. WP Admin carries the details for your WordPress admin area, you don’t want to lose that either. Finally, the wp-includes folder contains WordPress core files, it helps to have these when making your backup again.
To make a backup of your WordPress files you can log in to your server via your hosting cPanel or you’re going to need an FTP Client such as FileZilla or Transmit which you can download for free.
For both, you’ll need to download your Database and Files.
PLEASE READ THE NEXT SECTIONS CAREFULLY!
Back-Up Your Site via cPanel
Note! If your site is large (over 3GB) it's best to use FTP, as using cPanel may increase server load and slow down your site.
You can create the backup quite easily by doing the following:
- Log in to your web host and navigate to cPanel. For most web hosts, the cPanel is usually the first page you encounter when you log in.
- Navigate to the File Manager, and go to your root directory which should be your public_html or Home directory.
- From here, just locate your WordPress files and folders. These will include:
- wp-admin, wp‐includes, wp-content, all files which have a wp- prefix, index.php, xmlrpc.php.
- In many situations WordPress is installed directly in the root and looks something like this:
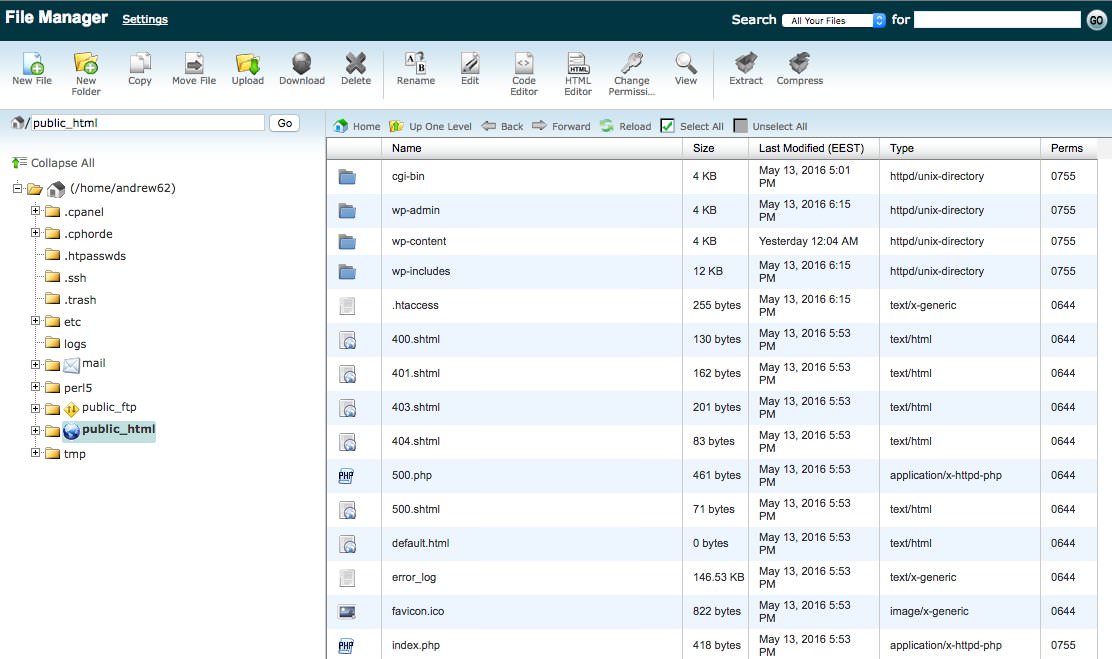
- Before you can download your WordPress directory you’ll need to compress it.
- Click on your WordPress directory, and select Compress from the menu bar. Alternatively, right-click on the folder and choose Compress from the drop-down options.
- Choose the compression type e.g. ZIP, GZIP, etc from the dialog box that opens. I would recommend ZIP.
- Then just hit the Compress File(s) button and wait for the process to complete. Your server will save your compressed WordPress folder
- Click on the archive file you just created and choose Download from the menu. Alternatively, right-click on the archive and choose Download.
- Choose a secure location on your hard disk and save your backup and you’re done!
Top Tip: Upload the backup to another location, such as your Dropbox account, Google Drive, or even email it if it's not too large. Try to have more than one copy in case one fails.
If your web host uses a different control panel e.g. vDeck, Plesk, etc, the process is still similar, locate your File Manager, and just follow the steps above i.e. Locate File Manager -> Locate your WordPress directory -> Compress -> Download, and repeat (once a week would be suitable).
Back-Up Your Site using FTP
For this example, I’m going to show you how to use FileZilla to backup your site.
- First, you’ll need to go back to your cPanel and make sure to set up an FTP account (it should be located in the FTP Manager section, if you’ve got lots of images also enable SFTP), note the details you’ll need them for the next step.
- Use FileZilla to connect to your account, you’ll need the following information:
- Host: enter your domain name, for example, if your domain is johndoephoto.com enter johndoephoto.com
- Username: enter your cPanel username.
- Password: enter your cPanel password.
- Port – you can leave this blank unless your hosting provider states otherwise.
- Now it's time to download those files.
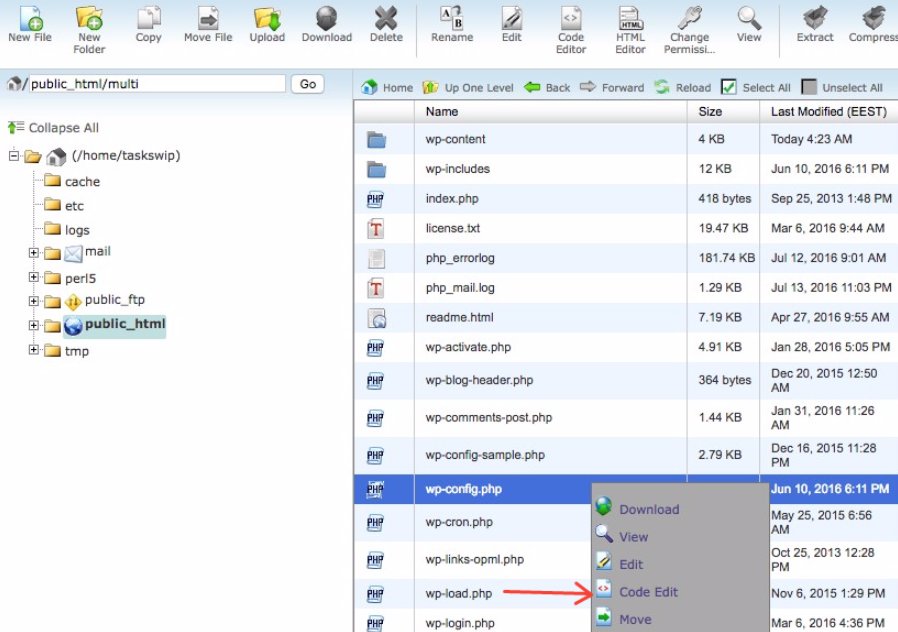
- Step 1 – On the left locate the backup folder you want to add your content to, if you haven’t got one created already, you can create a folder called back up on the desktop.
- Step 2 – On the right-hand side locate Public_HTML
- Step 3 – Now drag and drop your wp-content folder to the left, and also locate your wp-config file and move this also.
- Step 4 – Wait until it finishes.

Backing up your WordPress Database
To backup your database, you’ll want to be logged into your cPanel as above. Then you complete the following steps:
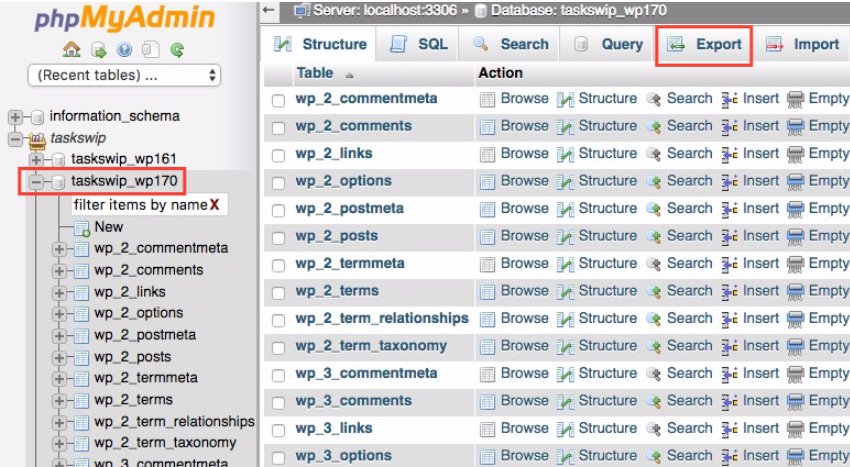
- Find your phpMyAdmin option, it's generally located in “database tools”.
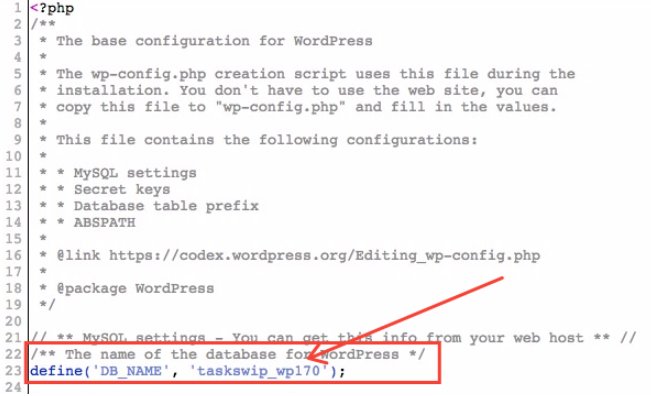
- You should then be in your phpMyAdmin admin panel, on the right select the database you want to backup. In order to find the correct Database, it is necessary to check the wp-config.php file:
 then open it and find the line that starts with “define(‘DB_NAME’ ”
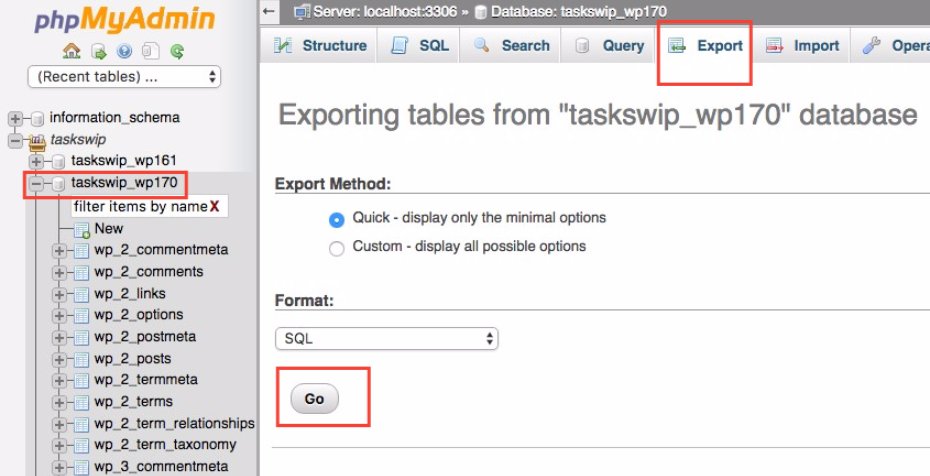
- Now that you know the Database name, you can click on it in PhpMyadmin and export it:
- Finally you’ll get to the export page, you’ll want to use the quick export method, and then simply hit go:
That's it! You’ve now successfully completed a full backup of your site.
The next section will explain how to use plugins to create a site backup.
Plugins
Finding it difficult to create a manual backup of your site? Not a problem, there are plenty of plugin solutions that can help you create a full backup of your site. In the following section, we cover some details on useful plugins you can use to create backups of (and in many cases, they also help restore ) your site.
UpdraftPlus WordPress Backup
One of the highest-rated backup plugins on WordPress.org UpdraftPlus WordPress Backup is a powerful tool. It's free to use, and you can back up your entire site to the cloud (Amazon S3, Dropbox, Google Drive, FTP, Email, and various other options). Using this plugin will allow you to restore your site in a single click, you can schedule backups, and even split larger sites into multiple archives. Packed full of features, and with ease of use, I would highly recommend this plugin.
Just make sure that you’re not running your backups too often, especially on shared hosting, as this may use up your data allocation.
If you don’t have your own cloud storage options or want premium support with the plugin, you can upgrade to UpdraftPlus Premium, this will store all of your backups on their own cloud service.
BlogVault
BlogVault is simple to use, it's safe, and it makes backing up your site painless. To make a backup of your site you should first sign up for a BlogVault account, then you can download and install the plugin (they also offer to do this for you). As soon as the plugin is activated it will make a backup of your entire site, that's the database and files. The plugin will then make regular backups of your site, and it only backs up new site information daily. You can then revert back to any previous version in the last 60 days. You can also download a full backup of your site to your computer, or use the feature to migrate a site to a new domain or hosting.
BlogVault also has a really unique feature called “Test Restore” which allows you to check the backup version before you go live with it. You can simply choose an old backup version, temporarily restore it on BlogVaults test servers, and review it before pushing it live on your own.
BlogVaults pricing starts from $9.00 a month or $89.00 for the year for a single site.
VaultPress
VaultPress was founded by Matt Mullenweg, one of the co-founders of WordPress, and developed by his team at Automattic. It's a great way to keep your site secure, with regular malware checks, daily backups, automated restores, and a 30-day backup archive it's a great tool. Much like BlogVault, you can also use the plugin to migrate your site from one hosting to another.
Another added bonus with VaultPress is the built-in spam protection it offers with integrated Askimet, so you can be sure to prevent spam attacks on your site. Once you get this plugin set up it should be nothing but plain sailing for you.
VaultPress plans start from $9.00 a month or $99.00 for the year for a single site.
BackWPup
BackWPup is a free plug-in that allows you to create a full backup on the cloud for your site (Dropbox, FTP, Amazon S3). With a single backup zip file, you can easily restore your site. See the following article on how to create a free backup here.
With BackWPup, you can back up your database and export WordPress XML. Another good feature of this free WordPress backup plugin is you can check, repair, and optimize your WordPress database easily.
There is a BackWPup Pro version available for more comprehensive cover starting from $75 for the year, with a $45 yearly renewal fee.
Flothemes
Empowering You.