How to Use FloLaunch 2.0
Table of Contents:
1. How to Install FloLaunch 2.0?
2. Compatibility checker
3. Database Backup
4. Clone mode creation
5. Working on the content
6. Launching the new site

Step 1 – How to Install FloLaunch 2.0
You can download FloLaunch 2.0 plugin on our website.
Once the ZIP file with the Plugin components has been downloaded, proceed to upload the Plugin to your website.
Installing Plugin with a ZIP File
When you download any plugin, you will receive it in a ZIP File. (in some cases, your webs browser may unzip the file automatically. If this happens, you will need to zip it back up in order to upload your site)
There are a few simple steps, to install a Plugin downloaded in a ZIP File:
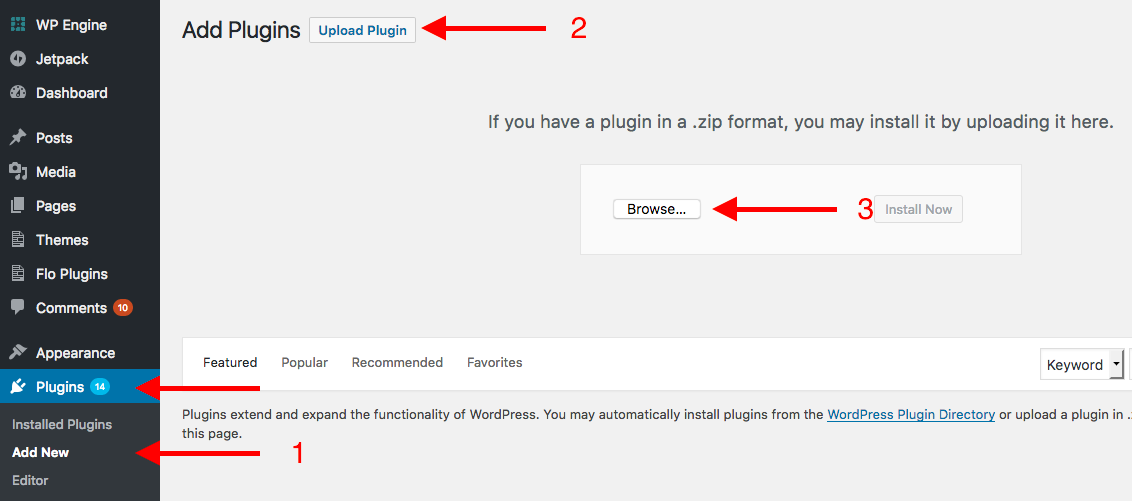
1. Go to Plugins – Add New
2. Click on Upload Plugin
3. Click on the Browse… button to locate the plugin within your computer and upload
Step 2 – Compatibility checker
Before we start making any changes or cloning, we need to ensure that your server configuration is correct and no issues will appear during the process. At this stage, we check your PHP version, space availability, SSL certificate, plugins that can cause potential issues. If the compatibility check is passed, the next steps are safe to be executed. In case any setting doesn’t correspond to FloLaunch minimum requirements, you will be notified and the options to solve the conflict will be suggested. Once all the requirements are met, you will proceed to the next step.
NOTE: Please note that the FloLaunch Plugin is a free product fully developed by Flothemes and we can't guarantee compatibility with all hosting providers.
Step 3 – DB backup
In order to make things even safer, we suggest making a backup of your current site database. It will automatically be saved at your hosting account (WordPress uploads directory), however, after the backup is created you also have an additional option to download it to your computer. Having the backup on hand will help in case of urgency since Flothemes support or the hosting support can use it to revert the site back.
Step 4 – Clone mode creation
Now, when all compatibility tests are passed and the site database backup is created, the site clone can be created. The duration of the process varies depending on your server configuration, performance, free space, etc. Finally, you will get an option to activate the Clone Site.
Step 5 – Working on the content
As soon as you have Clone Mode created, there are two environments where you can work – your current live site and the new clone mode site that is visible only for you.
Note that you can also tweak live site contents the same way you did before creating the clone mode. You will however need to disable the clone mode to access your live site.
This is possible by switching between the live and clone modes that will be available for you from any page in the backend. The clone mode will be indicated with a different WP skin so you can always be sure what site you currently work with.
While you work with the clone site, you can build an absolutely new menu and pages structure, add new types of content, use different fonts and colors – there is no limit to what you can do here while your live site remains unchanged. Avoid deleting the files like images, plugins, themes, etc. since these are unique, and deleting them in the clone mode will affect your live site. When the clone site is ready to replace the old live site, you can advance to the final step.
There are a few important details to know when adding new content while your website is in Clone Mode.
There are 2 options when it comes to adding new content:
1. Add new content to both sites when working on updates.
Why? Because you have 2 separate website databases, new content should be uploaded to both websites.
* This is relevant to those who will continue blogging and updating the old site while working on the new one.
2. Add new content to the new site only without adding content to the old site.
Why? When launching your new website, you will use the new database and files.
DO NOT upload content only to the old site. If you do so, you will lose this content upon launching the new site.
In order to avoid any content accidents, be very attentive to the website version you are working in.
Step 6 – Launching the new site
At this step, you will go through the stages that are similar to steps 1, 2, and 3 above. First, we will make a quick compatibility check that is required in case any settings were changed during the new site setup process. After the test is passed, we will make a backup of the current site database (that allows quickly reverting the clone mode publishing process if necessary).
The third and final step is the clone site launch process itself: This step enables public access to your test mode site (which now becomes your new live site) and disables access to your previous site version. Since this process happens in a matter of seconds, no downtime will occur.
At this step, FloLaunch will also attempt to clear any known caching data to ensure the most consistent and up-to-date rendered version of your site.
If you can not launch your website at this step and your old website is reverted, there's nothing to worry about. Your work is safe and can be easily restored. You can either follow these steps or get in touch with our Support Team to receive help.